
I am co-writing this article with Kevin Sorensen who did the actual hard work and invented this plant mic rig. I say co-write for one of two reasons. One, he did the labor and should be credited for all the original thinking. Two, because when I asked him about doing a tutorial on his build he was humble and told me to write it.
I had the joy to day play as a boom op for Kevin on a feature film this past summer when it was 116F outside out in the desert. I spent the afternoon on set in a 8ft by 8ft windowless shed acting as a sweat box prison cell for the film. Kevin was always checking up on me on talk back, making sure I had a water bottle and would bring me one if I was out. He’s always thinking about others and community and why I dub this the Sorensen Flower Pot Mic Rig, so that he is celebrated and his wonderful legacy will always live on.
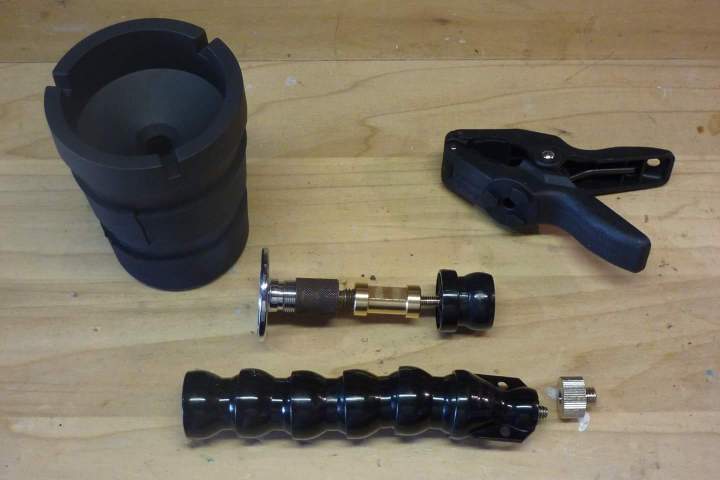
Items needed:
Car cigarette butt holder – http://amzn.to/2iXvwz5
Pop Rivetor – http://amzn.to/2zwLbf7
Dinkum Flex Arm – http://amzn.to/2hXDHKY
Rycote Shock Mount – http://amzn.to/2EIWpk0
Spare Dinkum Flex Arm Base – http://amzn.to/2GOmQ8f
Fender Washer (Same size as the Fender washers used in our Talentcell Battery Hack)
Surface-mount Mic Flange Adapter (Male)
3/8″ male to 5/8″ female screw adapter (what some boom poles require)
3/8″ female to 1/4″20 female coupler
1/4″20 female to 3/8″ male adapter (comes with the Dinkum Flex Arm)
Silver Sharpie – http://amzn.to/2EGYIUq
Dremel or Hand Saw – http://amzn.to/2E24seH
Drill with varies drill bits
Foam insulation tape – 1/4” – http://amzn.to/2FLtsTw
**** If you buy a Mic Stand to 1/4” 20 screw adapter You can build this slightly cheaper but it will be shorter by a few inches. http://amzn.to/2E19Uy7
Step 1:
Disable the Dinkum Arm from the clamp. Then screw in all the items in this order.


Step 2:
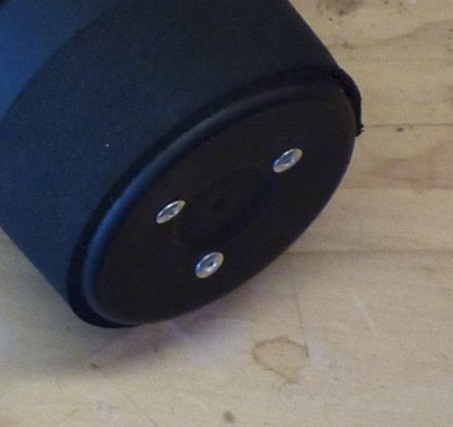
Place your newly created construct on the bottom of your car cigarette butt holder. Using your silver sharpie mark where the 3-4 holes are on your adapter plate onto the cup. Use your drill and drill in holes into the bottom of your butt holder. Place your construct into the cup, line up the holes and fill each hole with a rivet. MAKE SURE YOUR RIVET GOES IN DEEP ENOUGH AND PAST YOUR SURFACE MOUNT MIC FLANGE ADAPTER! If your rivet is too short it will not grab onto anything and hold. Also make sure your rivet is the proper diameter, too small and it will not hold.
Step 3:
Screw the 1/4″20 to 3/8″ adapter to the flex arm.

Step 4:
Use a saw or Dremel to cut down the height of the Butt Cup. This will allow more room for your flexible arm to move. Snap your flex arm back onto its base that sits top construct. You can add the insulation foam tape around your Butt Cup at this time.

Step 5:
Screw on your favorite suspension mount and your done!

When finished it should look like this. Use a low profile XLR for your cable run and you’ll be able to tuck away your Sennhieser MKH-50 even in the tightest of sports carts.

 About the Author

Andrew Jones is a location sound mixer based in Los Angeles. He started in the TV and Film industry in 2004. You can email him at Andrew@HoldForSound.com

He forms the enjoyable and informative articles related to Web Design Company and SEO Company in the UK.
It provides flexible operating here we are
at the employees and one can have pretty large wage along with the appropriate spare time.
This means that all of the content that your users can see, including buttons,
menus and clickable links will be index-able.
LikeLike