
I have for years lusted after the hardest to find piece of film gear on the planet. I am not talking about the Zeiss f0.7 Stanley Kubrick / NASA lenses. No, I am talking about the Joker Box.

They are manufactured by Ben Mesker, a DP in Orlando, who makes them in his spare time. The key word being spare time, because it seems Mr Mesker is very in deman. He has only done 3 or 4 production runs since he invented the utility box in 2010, each one selling out.
I have wanted one for years. A few years ago, back when I was still a DP/1st AC, I decided to make my own.

And the box worked pretty good. I would bring it along to gigs I was ACing or running camera on.

 The box got a lot of great reviews from people who worked with it. And when I transitioned into the sound department the box would also make the transition.
It already had a 2″ hold in the middle divider, so I added another 2″ hole on one side so it would act as a boom pole holder.

The reason for my most recent furthering development into designing a utility apple box is I hardly ever drive a car, I actually Uber to a lot of my gigs in LA. I do this so I can avoid having to learn how to read parking signs. And the number one Uber vehicle in LA is the 5 door Toyota Prius. When I received my Zoom FRC-8, I immediately started to build a Rock N Roller/SKB style cart. This quickly started to present issues and I knew I needed to think minimalism in design. Thus the boom stand / apple box needed to double as my gear pelican for transporting equipment to set and morph into a mini Eurocart.

I added a piece that could slide out and be reinserted back in to act as a foot to keep the “cart” from tipping forward when you put weight on the Zoom FRC-8. If you are a sound devices users using the CL-12, you will want to scale this to match the weight of the CL-12. The blueprints below can scale to match the widths of your audio bag / mixing surface.
To build this you need to figure out the following values.
- D – Height of your audio bag
- H – How tall you want your audio bag to sit in front of you
- T – Thickness of the plywood you want to use (typically 1/2″ or 3/4″)
- W – How wide is your audio bag WITH XLR cables plugged into your recorder
Cut List:
- 2x Side Panels: Dimensions (H) x (D +T +T)
- 2x Middle Panels: Dimensions ( W) x (D)
- 2x End Caps: Dimenssions ( W) x (D+T+T)
- 2x Lid Panels: Dimensions ( W) x (H -T -T)
- 6x Divider Panel Guides: Dimensions (1″) x (D)
Blueprint:
Middle Divider / End Cap:

When you make the cuts for your end caps, ignore the words in this blueprint. Remember the End Cap panels are ( W)x(D+T+T). The addition of +T+T is to make up the difference for the thickness of the wood that is the lids.
Foot:

Here is a closeup blueprint of the foot.
Take the 2nd “middle divider panel” and use that to create the foot. You will need to indent the sides. You can use the wood from the indention on either side by the Value of (T) as the wood added to the end of the foot that’s raised. It’s important that the raised up part is the same thickness as the plywood your using. You could also just cut yourself a (1″) x ( W -T – T) piece to achieve this raised up part.
Foot Lock / Interior of the Box:

The way the foot locks in will be something you will want to play by ear once you see how far into the foot you put the indention. You do not want your indention on your foot to be longer then were the stopper is placed in your foot lock. This would cause your foot not to be able to be slide reversed back into your box and would also cause your lid not to sit flush on your box.

Mirror the divider guides and foot lock on both interior walls of the box.
Lid / Back Wall:
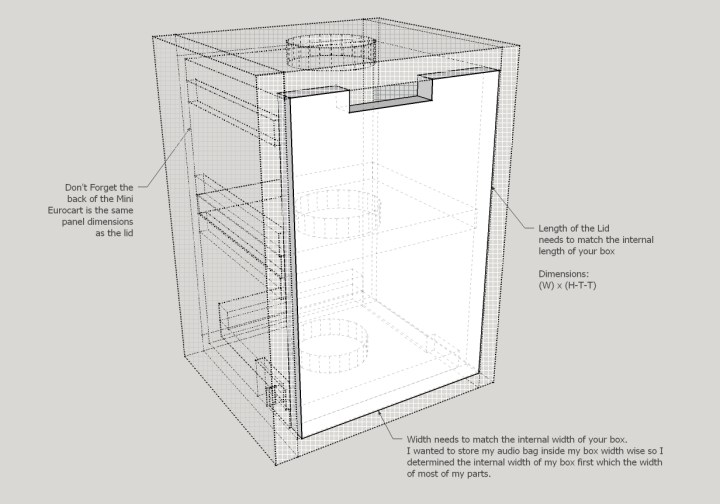
Cut a notch on the lid so your hand can slide in and lift the lid up. You could also add magnetic cabinet locks to your lid/box to keep the lid secure during transportation.
Assembly:

As you can see it is assembled using the ever simple butt joint.

Better wood workers then myself will read this and insist on a dove tail or something stronger and prettier. But I find with plenty of finishing nails (or wood screws) this utility apple box is plenty strong using butt joints.
Pair this with a collaspable hand dolly like the Magma Cart and you have a miniature Eurocart.
I hope you found this tutorial useful. It was A LOT to put my 3D modeling skills toward something I love. Don’t forget to leave your comments below and please share this on Facebook and with your friends. I think having this instead of a standard apple box is the future!
 About the Author
Andrew Jones is a location sound mixer based in Los Angeles. He started in the TV and Film industry in 2004. You can email him at Andrew@HoldForSound.com
