
For this tutorial we will be working with a dumb slate, though the principles will work with any acrylic surface. A dumb slate is called that because it doesn’t provide timecode to the camera. These are the acrylic slates that sell from $15-90 on Amazon and Filmtools. Don’t spend more than $20, they are all identical in build quality. I’ve had the $90 IKAN iPad film slate and it broke with 3 days of production. In the end its just 1/4″ acrylic plastic cut to 11″ x 12″(ish) and glued into a slot on a wooden clapper.
 I personally bought my dumb slate at La La Land in the heart of the Hollywood tourism district. I spent around $17 for one with a color spectrum on the clapper. This can be helpful to editors who want to reference those colors between takes for color corrections. It can also just be more fun to have colors than a basic black and white slate. But if you ordering yours from Amazon.com I suggest you buy the Newwer branded slates.

These slates benefit from the same lack of data that mine did from La La Land. They don’t put EXT, INT, NIGHT, DAY, and MOS in the lower right hand corner of the slate. None of this info is needed anymore since 99% of stuff shot today is digital. MOS should die! There is no reason why there shouldn’t always be reference audio recorded into the camera. I mean its recording a L/R stereo mix no matter what. You aren’t saving the production any data storage by not setting up reference audio.
I modified my dumb slate to include the 1st four tracks of audio I was recording on my field mixer along with some extra camera metadata. I only added the camera metadata so the DP/1st AC were more likely to use my slate over their slates.

The benefit of having the 1st four tracks of audio listed on the slate is that this acts as a visual sound report to the editor. Now they won’t have to shuffle though all the papers on this desk to find out what was being recorded on which track. It’s also great for productions that don’t use sound reports, like corporate videos.
Often when doing industrial videos, they only slate when they start shooting to a new media card. The quick pace of these productions and small crews don’t allow for slates to be called on ever take and often there is no story boards anyway or official scene numbers. These types of productions also lend themselves to a lot of host speaking to camera type work, so you aren’t having to swap body transmitters around a lot or move actors to different channels throughout the day like you would with a narrative project. Slate it at the beginning of the day, and the editor will be set for the whole shot.
 Items needed:
Step 1:
Clean your slate. What you are about to is not reversible. But if you do find that your lines aren’t perfectly straight you can erase your sharpie marker with a trick. A 1st AC taught me that if you go over a sharpie marker with a dry erase marker, it magically cleans the surface and the sharpie is gone.
Step 2:
 Draw your boxes how ever you want with your sharpie and ruler. You should plan this out for spacing so it looks professional, alot of editors will hopefully be seeing your DIY work in their edit bays.
Step 3:
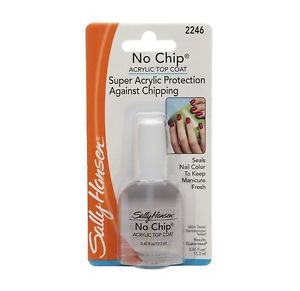
Once the sharpie ink has dried you can go over each line with a coat of clear nail polish. This will seal it forever. Not even the dry erase marker trick will work at this point. I sealed my lines a week after marking up my slate just so I knew I had the boxes spaced like I wanted. Now you are done!
I hope you enjoy your newly modded slate. I labeled my boxes with label maker tape but you could also do this in Sharpie if you have great penmanship. This simple mod hopefully will enhance your workflow on those fast paced productions.
 About the Author

Andrew Jones is a location sound mixer based in Los Angeles. He started in the TV and Film industry in 2004. You can email him at Andrew@HoldForSound.com

2 thoughts on “Tutorial: Modifing a Film Slate for Location Sound”