
Often overlooked but an essential component for powering your devices, the cables and connectors. In part 3 of this guide I go over the options and requirements.
This is part three of a series of articles, split up as follows:
- Batteries: A Battery is a battery, is a battery
- Battery distribution system (BDS) and mounts
- Cabling and connectors
- Charging and various accessories
Cables
whether you use a battery with or without a BDS, somehow the power needs to get into your equipment, and yes, to state the obvious, you need a cable for that.
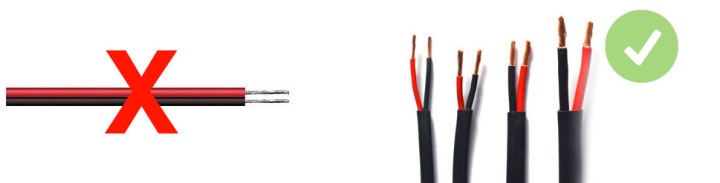
Now, since almost all equipment we use in a typical audio bag use very low current (amperage) and pressure (voltage), I’m almost inclined to say that just about any 2 conductor copper wire would do the job perfectly. And that’s true, but still there are some things to keep in mind.
Let’s say the most power-hungry machine you will ever use with in your bag based system is using 10 watt (an hour, most likely your recorder) still some calculation can be done to get the minimal amount of wire gauge (millimetres) needed. There are calculators online to find that out, and for 10/12 watt (1 amp @ 12 volt) we are talking about 1mm or 18 AWG per conductor (and we need two for plus and minus). So when shopping for DIY cables keep that in mind. Obviously prefab cables are rated for that.
Another thing to keep in mind is the shape and state of the cable, don’t get a cable that’s to stiff to handle, or those two separate ones sort of glued together.
Connectors
Now we get to the interesting part. Your device comes with a certain connector input. For recorders the standard seems to be Hirose 4 pin nowadays. To be exact the part number for this is HR10A-7P-4S. It’s a 4 pin connector but we just need two for powering. Intelligent power distributors and batteries like the ones from AudioRoot are using the other two for data checking and exchanging.
Like our anthem, ‘A Battery is a Battery‘; A connector is a connector. As long as the connector is rated for the power we use them for (and frankly, since we are using a very small amount of power, most of them are), we can use it for our audio bags. So it’s important to keep your total power usage in mind when selecting a connector. Let’s say your recorder is using 10 watts, your 2 wireless RX 1 watt each, you need a connector rated for 12 watts minimum. Again, this is a low value, most connectors go way above that.


XLR connectors are another popular connector in the audio-visual world, usually the 4-pin one, to make it distinct from the ‘normal’ 3 and 5 pin ones we use for microphones. As like the Hirose 4-pin, pin number 1 and 4 are commonly used only.
The D-tap connector, made popular by the battery manufacturer Anton Bauer is also a much used connector, since a lot of (camera) batteries already come with an output socket for them. The downside is that it’s a friction fit. overtime they can come loose, especially the Chinese knock offs.


Most non-industry standard batteries like the TalentCell come with the standard DC power jack we know from about any DC-powered equipment out there. the round barreled semi-friction fit, coming in a lot af diameters, different from device to device, from battery to battery. Whilst they usually are from the non-locking kind, Switchcraft is making screw on ones, used for example in the RemoteAudio BDS. Corresponding connectors can be soldered on lead cables to and from the batteries you use, or to a battery cradle.


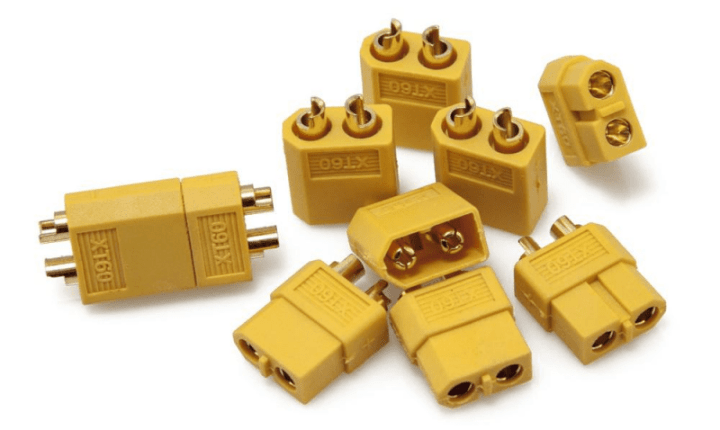
I want to draw a bit of attention to connectors from other industries. We are in a drone world now and most non DJI drones are running so-called LiPo batteries. As I mentioned in the chapter about batteries, you need to be cautious with LiPo batteries, though, the connectors they often use can be very handy for location sound bags. There are couple of standards, XT is arguably the most popular one. It looks almost like an D-tap connector, but they are not interchangeable. They are friction fit, but still very tough. I can imagine one will use them in a bag on things that not need to be connected and disconnected often.
Using your own style of connectors, not the common industry standard ones has a downside, you have to keep in mind that you can not just use them with off the shelf components like BDS systems, batteries etc. So if you decide to go this route, it might be wise to make a couple of jumper cables to use them with the standard connectors out there.
Cable splitters
So As we went over in the battery distribution chapter, you can simply use a of the shelf splitter, solder on a couple of connectors of your choice (or what your devices are using) and that will work perfectly fine, as long as all components meet the power requirements. The aforementioned D-tap system also available as an of the shelf splitter box.


Polarity
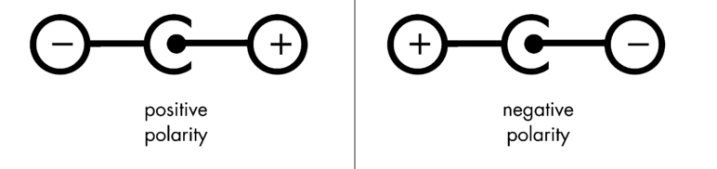
A big caution: Polarity. As mentioned in the first chapter, DC power comes with a positive and negative connection, meaning the electricity is flowing one direction only. We have to respect that, otherwise our equipment might smoke a bit… Although there are some standards out there, it is always wise to check the provided manual of everything you want to connect together, to make sure you are not connecting the positive and negative the other way around (changing polarity).
This is part three of a series of articles, split up as follows:
- Batteries: A Battery is a battery, is a battery
- Battery distribution system (BDS) and mounts
- Cabling and connectors
- Charging and various accessories

Again, another excellent article! Thanks for writing these. I’m looking forward to reading part 4.
LikeLiked by 1 person
Thanks Tom!
LikeLike
Great! Thank you so much, it will help me a lot
LikeLiked by 1 person
You’re welcome!
LikeLike