
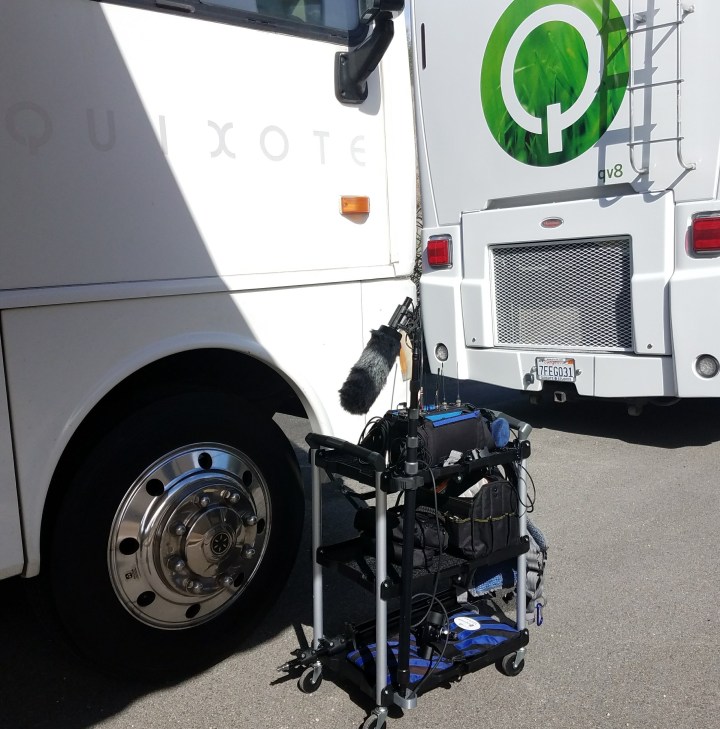
Olympia Tools reach out to me a month ago and asked if I would mod and hack one of their carts into a proper filmmaking style cart. I said YES! LOL
These carts sell on Amazon Prime between $50-$100 with free shipping. More often than not they average between $50 – $70 really.
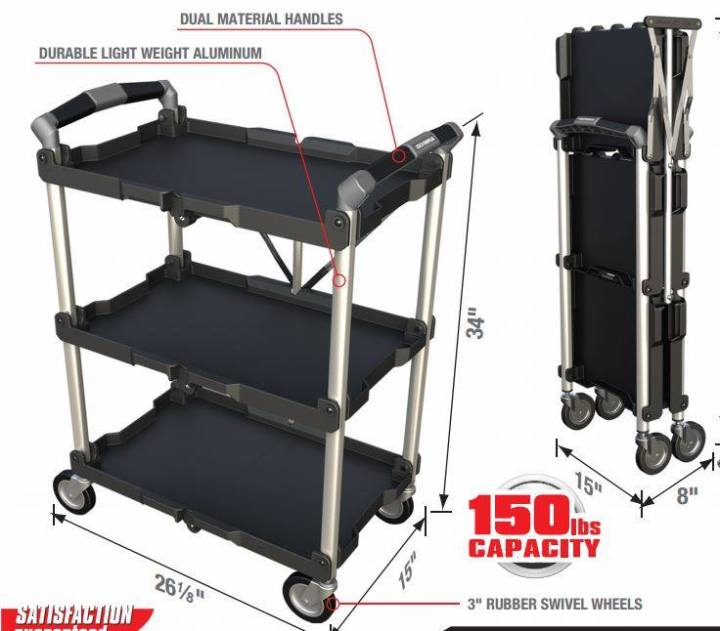
So they sent me the very popular Olympia Folding Service Cart. And over the past month I have been designing & researching upgrade parts, additions that work well with this style of cart and modding the cart to include some new features. The Olympia Tools cart is kinda like an open source design that is easy to develop off of and make your own. It has good bones.

Wrong kind of Bones…
Good Bones is a term that I am stealing from the hit HGTV show Flea Market Flip. It refers to when the guests on the episode find a piece of furniture at a flea market that can be rehabbed easily because the structure to the furniture is sound and intake. The same can be said about the Olympia Cart. The functionality of how it folds, the type of plastic used to make up the shelves, and the metal frame make it a very good platform to build on. As a stock cart, its a good buy. But keeping things stock is not something we do on at the WavReport… so lets Pimp this Ride!

New Casters:
The first upgrade isn’t my own idea (its supported by almost every sound mixer whose purchased this cart) and its the most expensive of all the upgrades, put new casters on this cart. The stock casters included on the cart are… indoor only. The stock casters work perfectly find on smooth surfaces like corporate locations and studio sound stages but maybe not the best if you need to go down a sidewalk that’s being maintained by the LA City Maintenance crews. Earthquake prone areas and concrete don’t go together.
I’m not going to link to any casters because they vary so much in style, size and price. Just know you are looking for M10-1.5 Stem casters. Some have said that 3/8”-16 Stem casters also work. I suspect they really are M10 and that the 3/8” metal threads have no problem recutting the plastic mounts at the bottom of the cart. The stock casters are 3”, a lot of people suggest going up to a 4-5” caster.
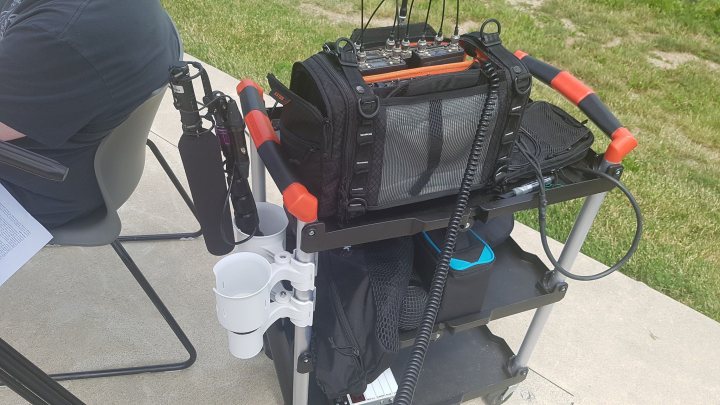
Robo Cup:
http://amzn.to/2D2wcu2
So this isn’t so much a hack or a mod as it is just an accessory that really excels on the Olympia cart. The round metal pipes used for the upright supports work perfect with the Robo Cup. In 2017 they updated the design to be stronger and added some new features.
The robo cup can stay clamped when you fold the cart up. 
Carpeting:
One thing that can be said about plastic shelves in general, not just the Olympia Cart, is that they are loud when objects are placed onto them. And while that’s just not exactly acceptable on a film set, especially if the noise is coming form the sound team. So I carpeted my shelves.
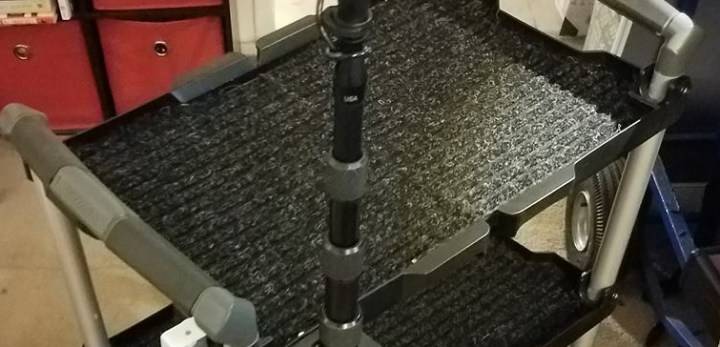
This is the CHEAPEST mod you can do this cart. $6-8!
- Buy 3x Charcoal Door Mats @ Home Depot. https://www.homedepot.com/p/TrafficMASTER-Rib-It-Charcoal-18-in-x-27-in-Door-Mat-904/202616518
- Cut Door Mats into the shape of the shelves using a razor sharp box cutter. To do this just place the door mat onto the cart, make sure your lines are straight, and stab your box cutter into the corner of the railings of the shelf. The plastic is SUPER strong and you won’t scratch it. I didn’t at least on mine. Work your way around the edges till you have half the cart done. Cut it now down the center so the cart can still fold. Use that half as your template and use a sharpie to trace the outline onto the rest of your 3 door mats. You should end up with 6 pieces all the roughly identical. You may need to do some minor trimming once you put them onto the cart for sizing.
- Use Guerrilla Glue to glue the rubber sides of the door mat to the cart. Place heavy books or say your wife’s nice vinyl record collection onto of the door mats to act as a clamp as the Guerrilla Glue cures. This may take upto 2hrs. Remember Guerrilla Glue expands and a little goes a long way. I used some printer paper to act as a spreader and thinned out the glue so it was more even. AVOID GOING NEAR THE MIDDLE OF THE SHELF! DO NOT GLUE THE 2x SHELF PIECES TOGETHER!!! YOU WANT TO KEEP THIS CART FOLDABLE WHEN YOUR ARE DONE!!!!!!!!
The door mat has a ribbed surface to add extra friction so things like your bags and pelicans don’t slide around. The “fabric” material is outdoor rated so it won’t grow mold or rot if it ever gets wet. And the rubber under the fabric helps add some cushion and reduces noise when you place metal objects onto it, like audio transmitters. The finished product also really classes up the cart and makes what is a $50 plastic cart a lot prettier and finished out when its infant of clients and producers.
Slim Boom Pole Holder:
Elsa:
https://www.containerstore.com/s/grey-elfa-utility-tool-holders/d?productId=10023232&q=Elsa

Most of the boom holders that exist on the market won’t clear the side handles of the Olympia Cart. The Elfa Tool Holder will and features a quick snap feature that lets you just click in your boom pole and walk away. They also won’t prevent you from folding the cart.

QuickFist:

The Quick Fist is a great mount that lets you use a a 10-32 bolt to mount it on any flat surface. The Fist is just under an inch tall which means you can mount it to either side or the front of the cart and it won’t restrict you from folding your cart.
The best part about the Quick Fist is that it locks. Once you put your expensive boom pole and fancy microphone into it, you don’t have to ever worry about it coming undone. Even if you were pushing your cart across a bumpy road the Quick Fist will hold onto your tools without any issue.
I personally use the Quick Fist on my cart and I love it. I paired my Quick Fist with a custom 3D printed boom pole cup that holds the butt of my boom pole. I designed the cup to so that it doesn’t interfere with the folding capabilities of the cart but also so that it mounts flush against the flat surface to reduce wobbling. You could also use a 1.5-2” PVC pipe cap.


Surge Protector:

I found the perfect surge protector that could live on this cart. This surge protector will allow you to point the USB ports straight up, making it super easy to make sure you’re putting the USB cable in the right way. The 120v Edison ports are on a separate side so even if you have some big wall warts they won’t cover up the USB jacks. Also the USB jacks are all optimized for the fastest charging speed by reading what the device is thats plugged into them. The On/Off Switch has a soft white light that has been described by others on Amazon as not harsh or makes the room glow. It also only has a 5ft cable so its just enough to reach the ground and give you some slack to lay flat when you plug it into a stinger on set. The last thing you’d want it too much cable that hinders you when your transporting the cart flat or gives you too much cable that it creates a trip hazard around your cart when your miking up actors. It doesn’t have the most AC ports out there but this is a Olympia Tools Bag Sound Cart, you aren’t running 5x Lectrosonics Venues and a few Sound Devices 970 units. You’re running your bag, recharging your iPad and possibly plugging in your 7” Viltrox Monitor that you bought after I did that review last year about it and you said “man that Andrew guy’s review is pretty half decent.”
Like I said, this power strip is perfect.. … ish. Mounting it will take some craftsmanship… but not like real craftsmanship. Just a cheap electric jig saw. (I linked to a corded model because as nice as cordless power tools are, I always forget to charge them.)
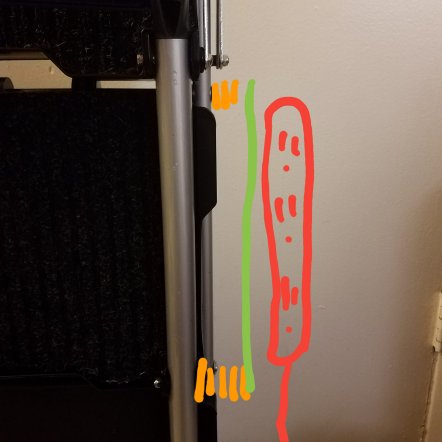
Here is a quick stupid diagram on how you could mount a power strip onto the cart.
- Orange: Teflon Washers
- Green: Particle Board cut (with that jig saw) into a long narrow 1.5” strip
- Red: Look I know its a bad drawing and all but thats clearly the power strip.
The bolts that hold the shelfs to the metal post can be removed and replaced. The stock bolt holding the cart shelves together is a M6x55, you’d want to replace that with atlas a M6x60 or M6x65. The stock lock nut can be reused. To mount the power strip to the particle board you could use heavy duty velcro or something more permeant like foam tape. This method can even be used on the back side of the cart where the horizontal brace lock is located without interfering with the folding of the cart. The idea of using the M6 screws for mounting stuff came from my Sound Mixer Jonathan Millet.
MOLLE Orangization:
Car Seat Back Organizer may look plan but its really what ever you want it to be. All the accessories that work with your K-Tek bags can now just be clipped into place on the this big MOLLE Panel. The panel is 14” x 22” which means its just wide enough to fit the sides of the Olympia cart but not be too long to hit the ground. It will actually end somewhere in the middle of the bottom shelf. The strap that would normally go around the car seat will in turn go around the 2 grey metal poles. When folded there is a 5mm gap between the plastic shelf and the metal pole, plenty for the nylon strap. The top strap could go around the side handle but really that is ugly and unpractical. My suggestion would be to cut a small hole at the top of the car organizer with a soldering iron and use a short M6-1.5 bolt with some fender washers and mount it directly into the side of the top shelf. This way it can hang from 2-4 mounting points and gravy can do the rest. Add your favorite MOLLE accessories like velcro flap pouches, water bottle holders, or whatever to give yourself some vertical storage so you don’t eat up all the horizontal are of the shelves.

By the end of the month I will have done all these mods and hacks and my cart will be a solid tool that will assist me on my productions. The Olympia Tools Folding Service Cart might be the best location sound bag cart solution currently on the market. And there you have it, you’ve been pimped!

 About the Author

Andrew Jones is a location sound mixer based in Los Angeles. He started in the TV and Film industry in 2004. You can email him at Andrew@HoldForSound.com

Thank you much!
LikeLike